
Configure Points Redeem Widget at PDP/Cart
On-Site - Points Redeem at PDP / Cart
Let customers use their loyalty points for a discount on the product or cart page. This guide covers setting up the Points Redeem Widget in Shopify and choosing how it looks and works.
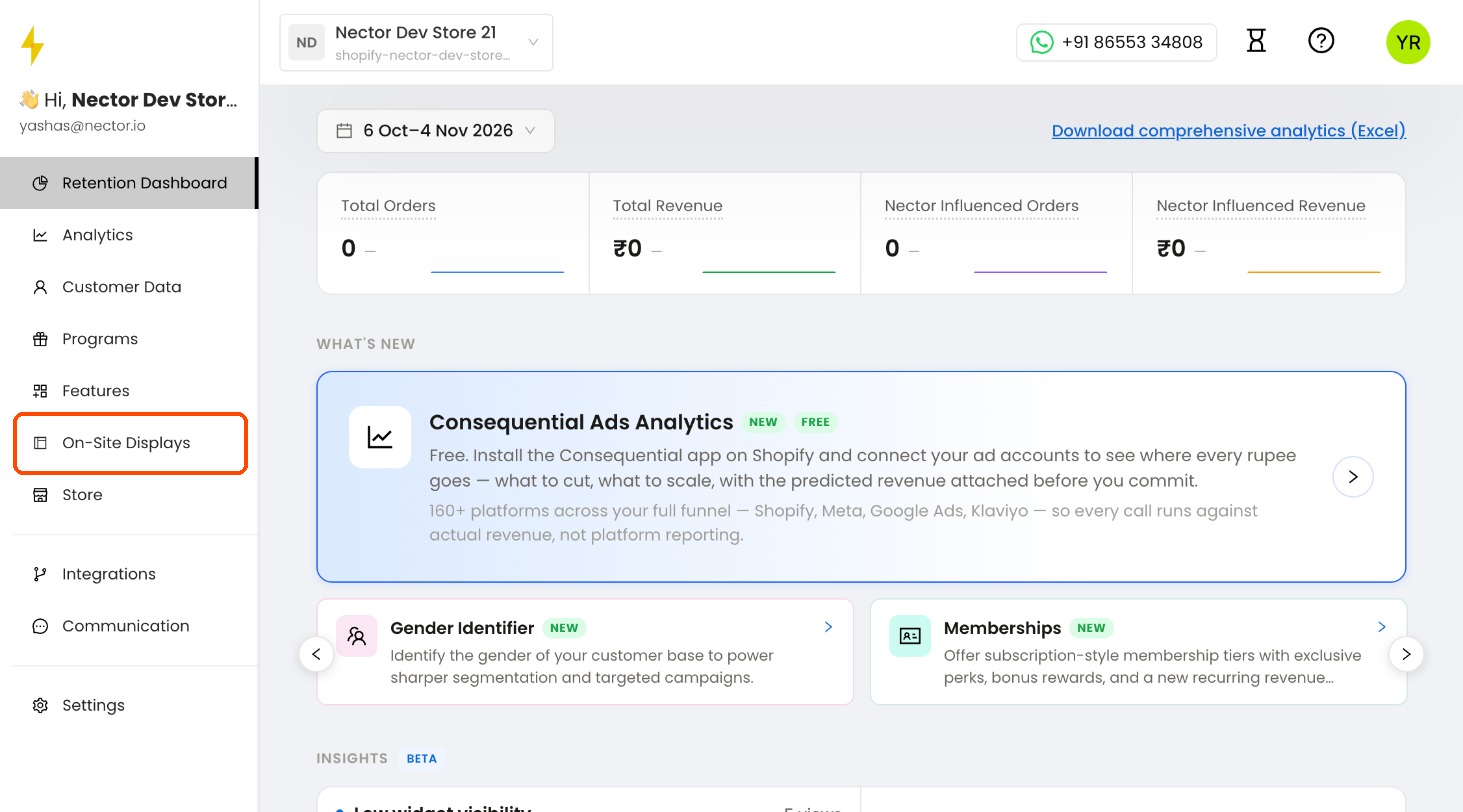
1. Open On-Site Displays
Log in to your Nector dashboard at https://merchant.nector.io/ and click On-Site Displays in the left menu.
The Points Redeem Widget lets customers use their loyalty points for a discount right on the product page or cart page, before they reach checkout. Signed-in customers see how much they can save with their points. Guests see a prompt to log in, for example "Login to check if you have NEC Coins to redeem on this order".
2. Open the Points Redeem Widget
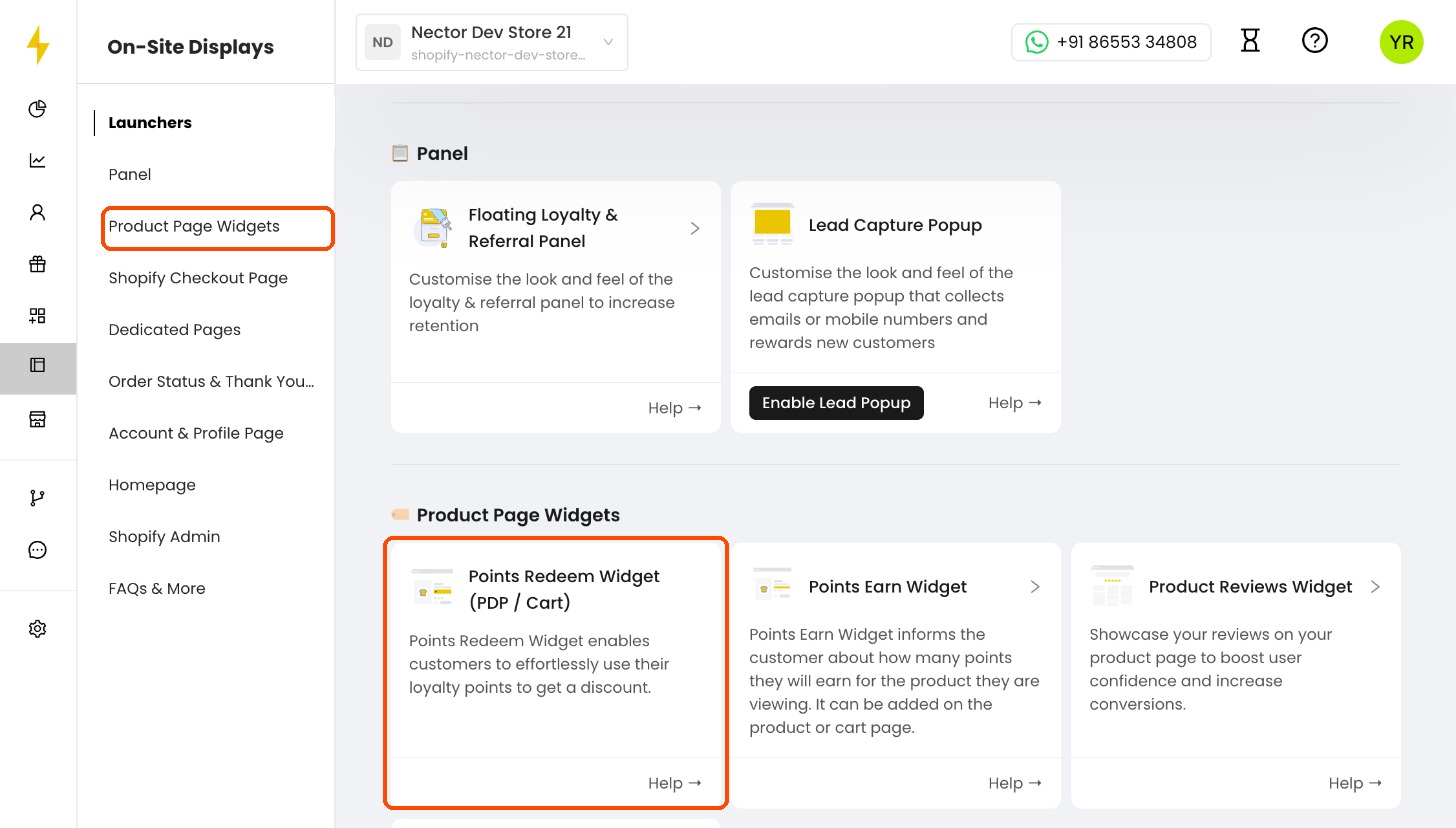
Scroll to Product Page Widgets and click the Points Redeem Widget (PDP / Cart) card.
3. Check the setup steps
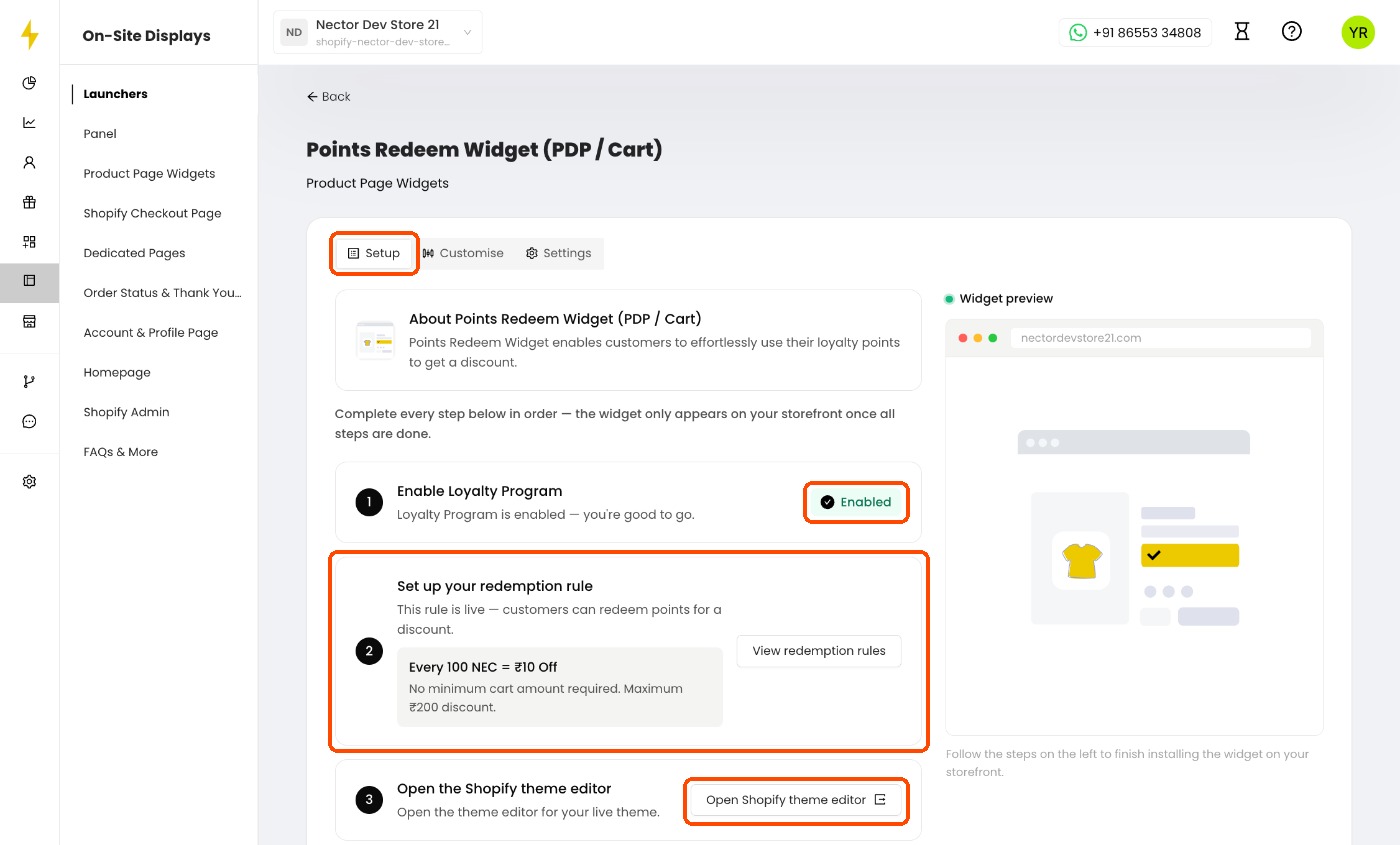
The page opens on the Setup tab, which lists what to do in order. The widget only appears on your store once every step is done.
- Enable Loyalty Program: this must show Enabled. If it doesn't, turn on your loyalty program first.
- Set up your redemption rule: the widget needs a redemption rule to know how many points are worth how much discount. If you don't have one yet, click Enable redemption. Nector creates the redemption setup and takes you straight to the rule, so you can check the points value before going live.
- Open Shopify theme editor: click this button to open the theme editor for your live theme in a new tab. The rest of the setup is done in Shopify.
The Settings tab shows which wallet the widget uses. If your store doesn't use a credit wallet, the widget redeems loyalty points.
4. Choose the type of discount
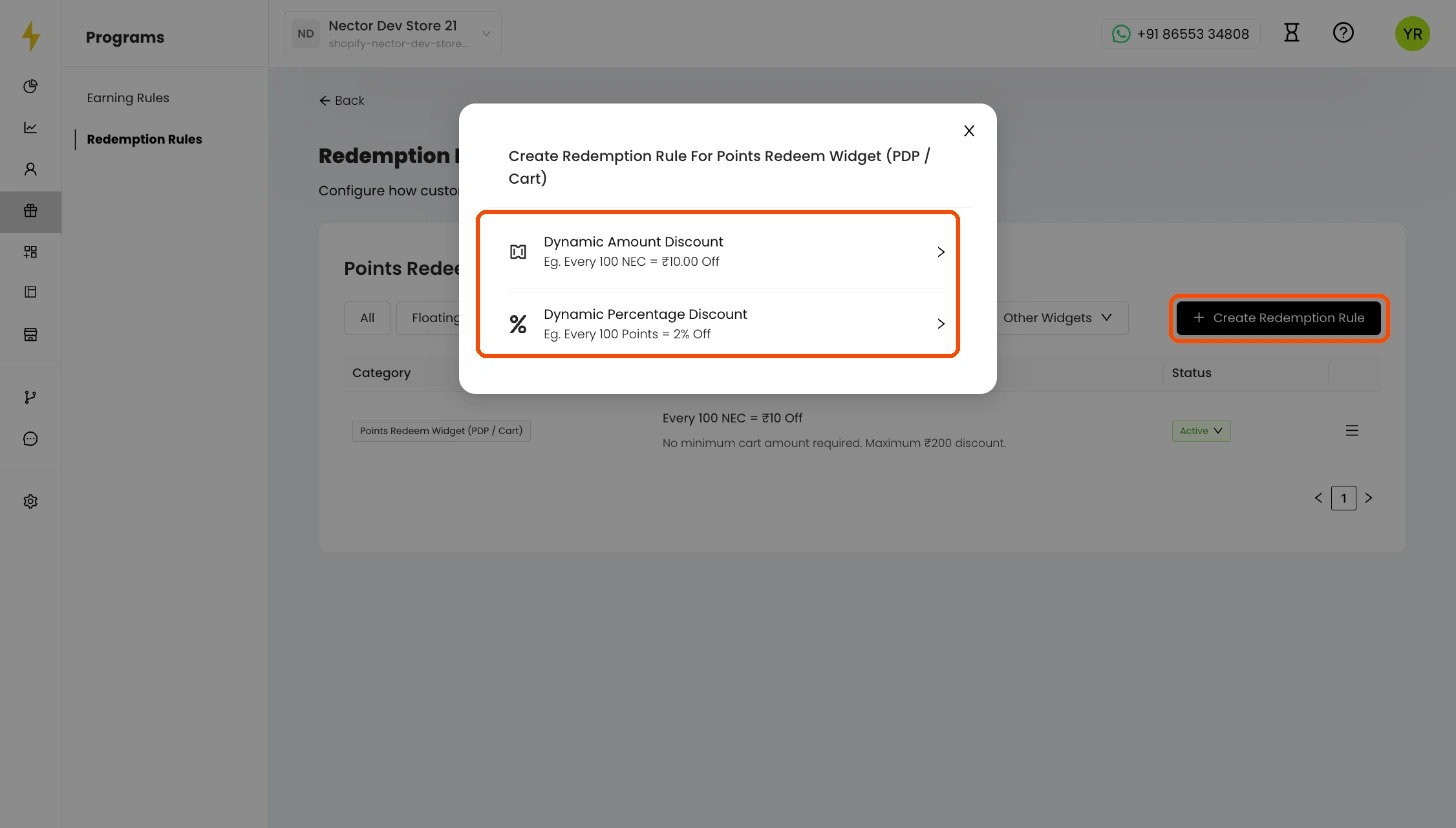
Clicking Enable redemption opens Redemption Rules. Click Create Redemption Rule and pick one:
- Dynamic Amount Discount: a fixed amount off, for example every 100 NEC = ₹10 off.
- Dynamic Percentage Discount: a percentage off, for example every 100 points = 2% off.
5. Fill in the redemption rule
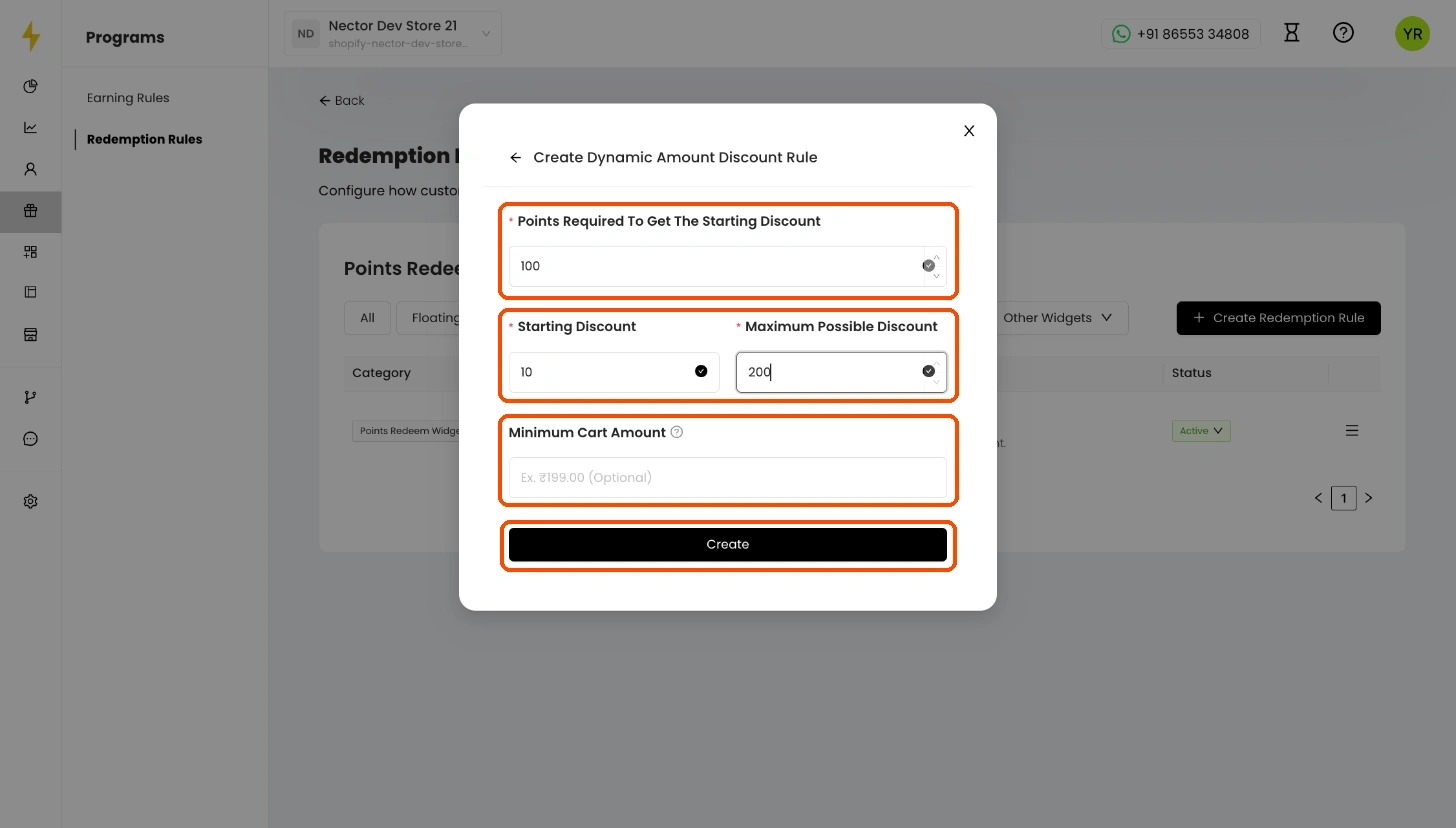
- Points Required To Get The Starting Discount: the fewest points a customer needs to redeem, for example 100.
- Starting Discount: what those points are worth, for example ₹10.
- Maximum Possible Discount: the most a customer can save on one order, for example ₹200.
- Minimum Cart Amount (optional): the smallest cart value the discount works on.
Click Create. The rule shows as Active, and the Setup tab now says the rule is live. Changes can take up to 5 minutes to show on your store.
6. Switch to the product page
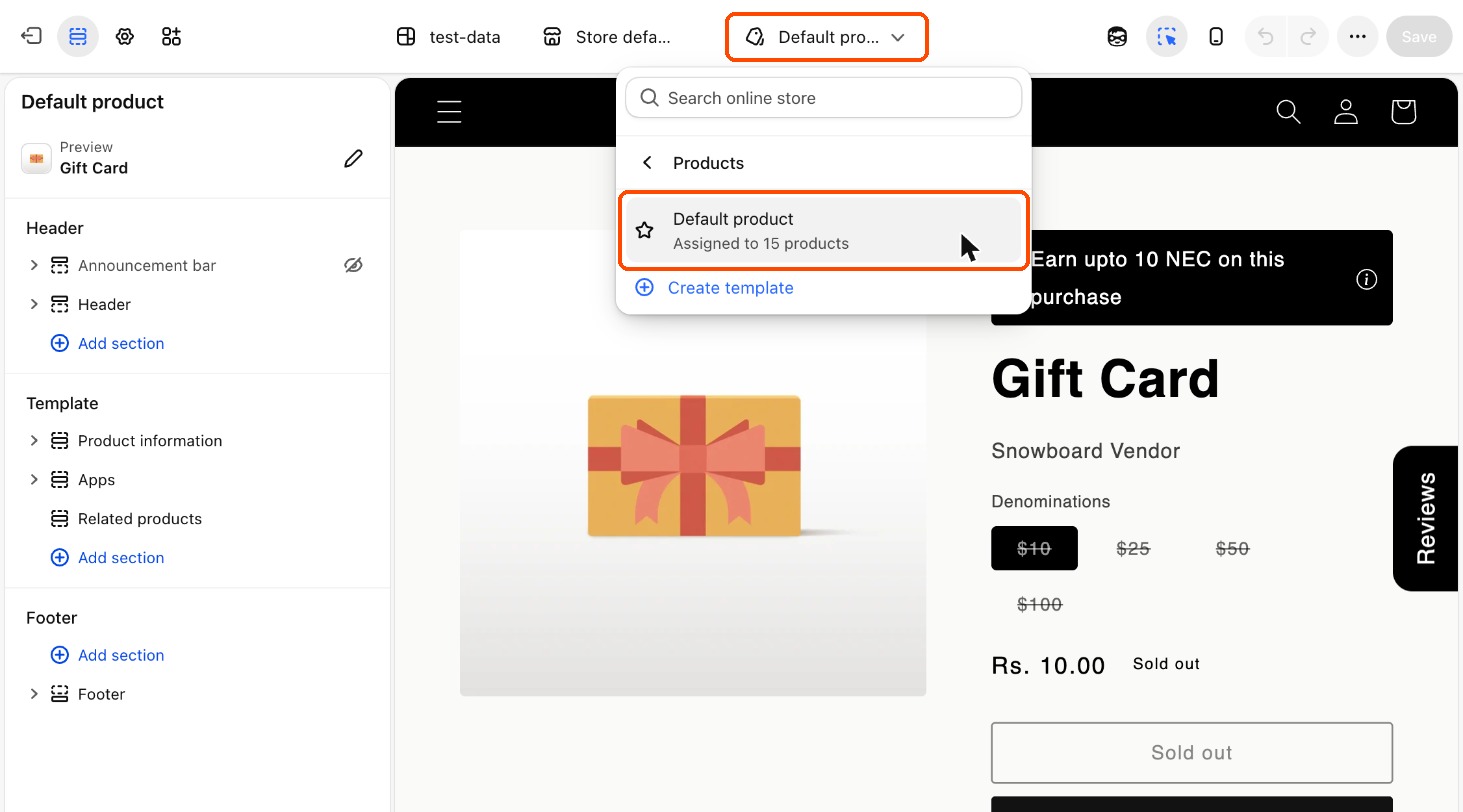
In the Shopify theme editor, click the page dropdown at the top centre of the screen (it usually reads Home page). Choose Products, then Default product.
To show the widget on your cart page instead, choose Cart. You can add it to both pages; repeat steps 6 to 10 for each one.
7. Add the widget block
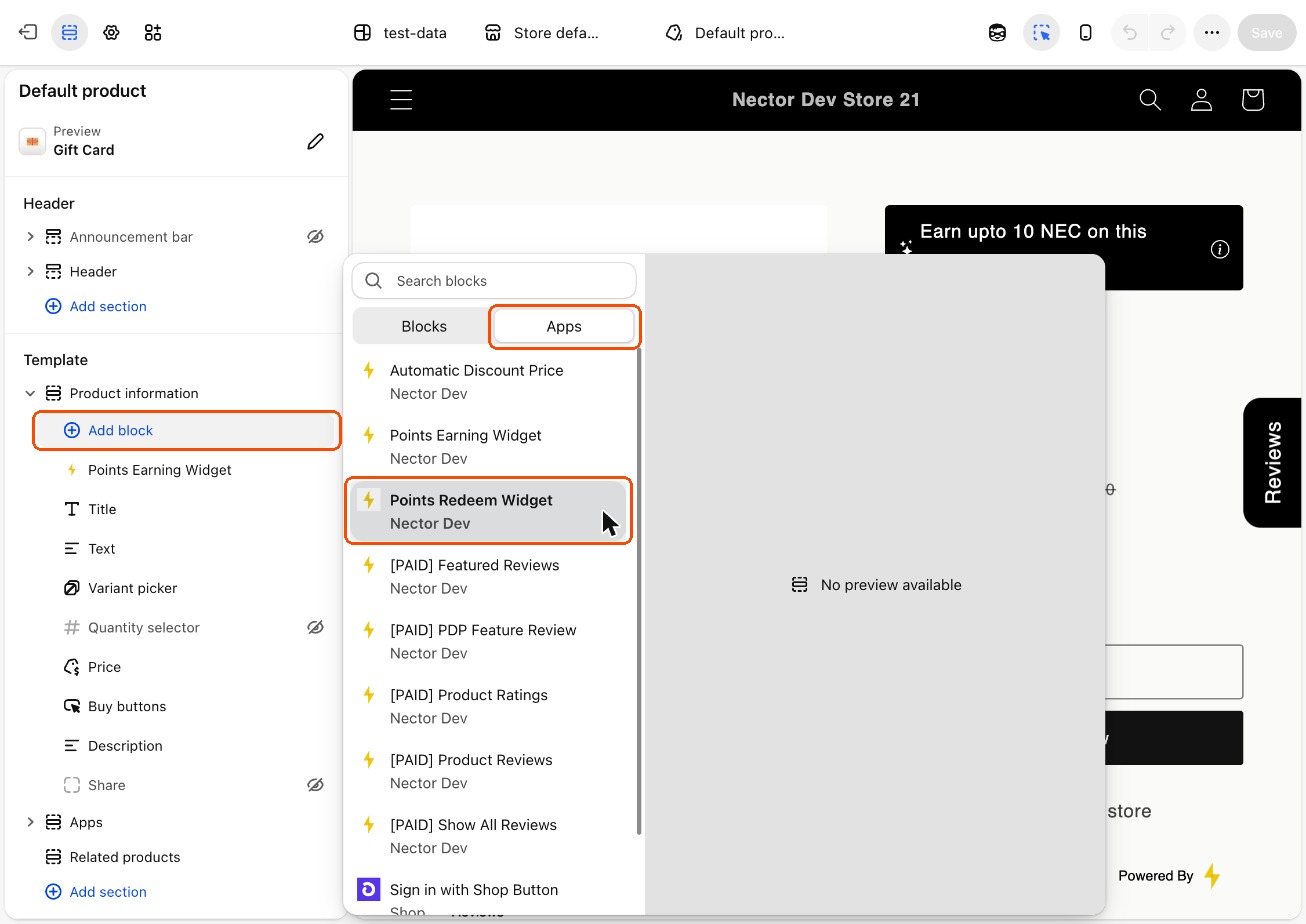
In the left panel under Product information, click Add block. Open the Apps tab and select Points Redeem Widget. On the cart page, click Add section instead.
To move the widget, drag the block up or down in the left panel. A good spot is just below the price, so customers see their discount next to the price they'll pay.
8. Set how the widget looks and works
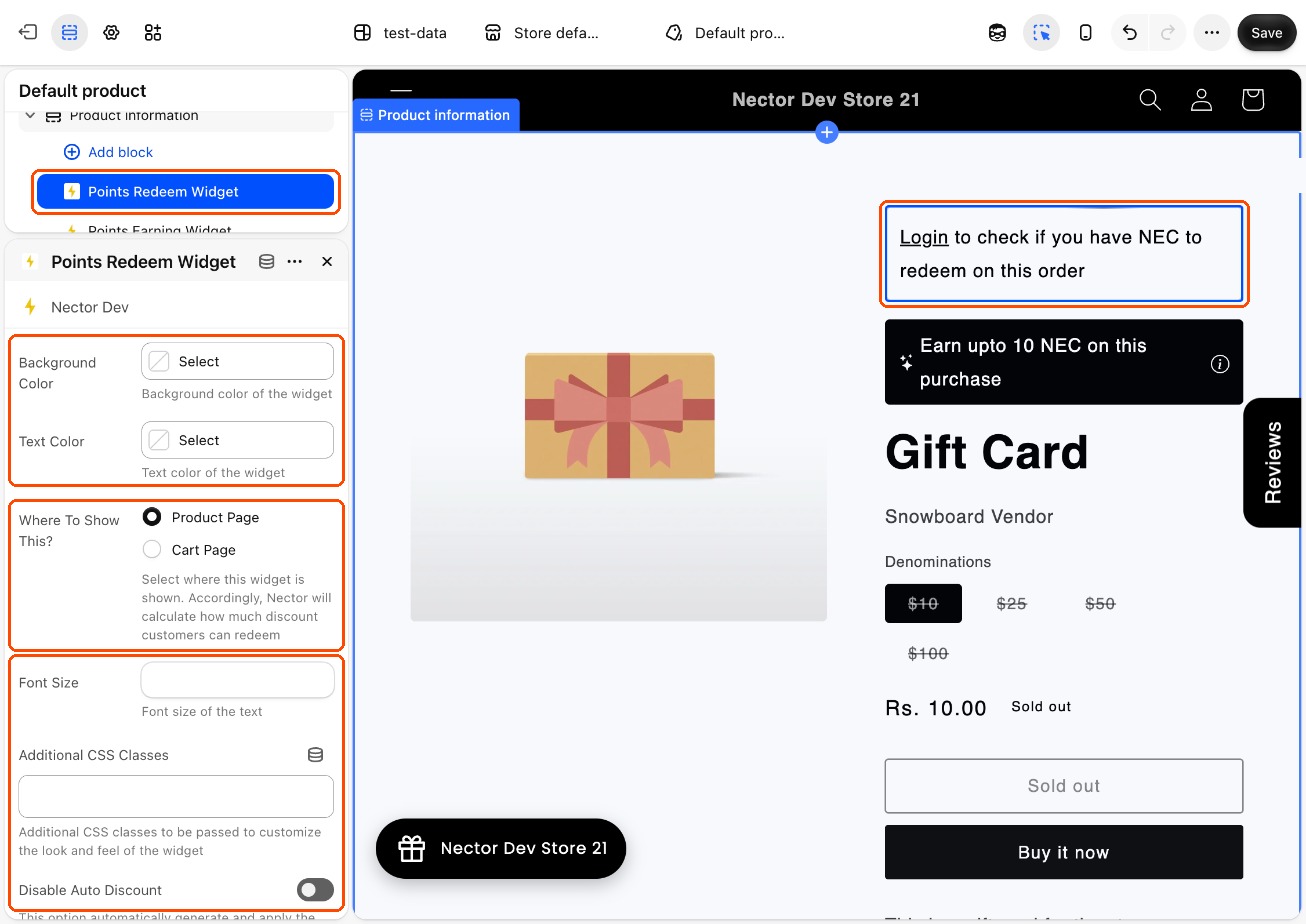
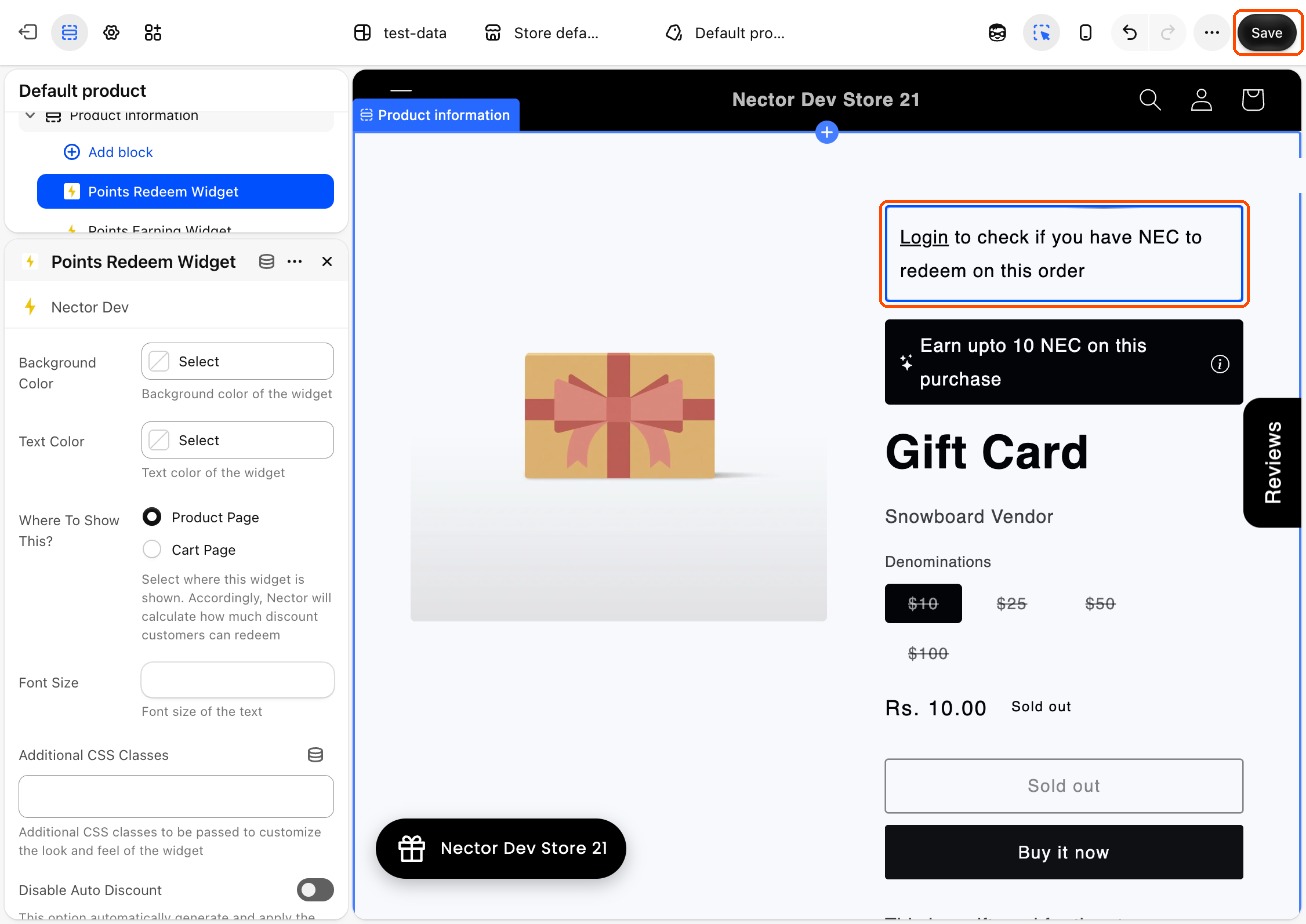
Click the Points Redeem Widget block to open its settings in the left panel:
- Background Color and Text Color: leave these empty to keep the widget's default colours.
- Where To Show This?: choose Product Page or Cart Page to match the page you added it to. Nector uses this to work out how much discount customers can get.
- Font Size: the size of the widget text.
- Additional CSS Classes: for developers who want to style the widget with their own CSS.
- Disable Auto Discount: by default, the widget creates a discount code and applies it automatically when the page loads, based on the price and the customer's points. Turn this on if you want customers to tick a box to apply the discount themselves.
- Hide For Guest Users: hides the widget from shoppers who aren't logged in.
- Redirect URL For Widget: where logged-out shoppers go when they click the widget. Leave it empty to open the Nector rewards panel, or paste your store's login page link.
- Hide Border and Hide Animation: remove the widget's border or its loading animation.
9. Change the widget text (optional)
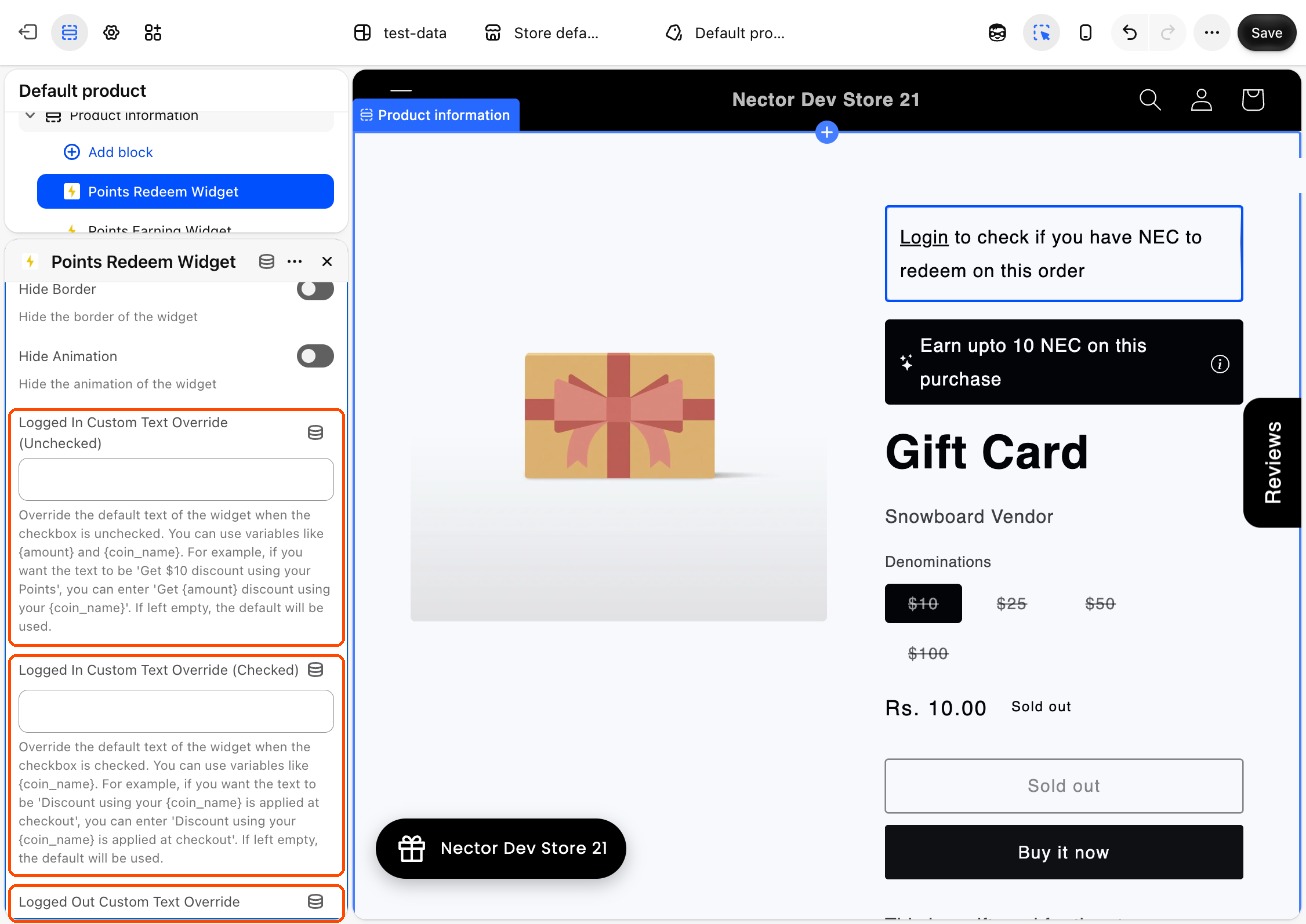
Scroll down to the three text settings. Leave them empty to use the default text.
- Logged In Custom Text Override (Unchecked): what signed-in customers see before the discount is applied. You can use {amount} for the discount and {coin_name} for the name of your points. For example: Get {amount} discount using your {coin_name}.
- Logged In Custom Text Override (Checked): what signed-in customers see once the discount is applied. For example: Discount using your {coin_name} is applied at checkout.
- Logged Out Custom Text Override: what guests see. For example: Login to redeem {coin_name}.
10. Save your changes
Click Save in the top-right corner of the theme editor. The widget now appears on every product page.
11. Check the widget on your store
Open a product page on your store. Check the widget both while logged out and while logged in:
- Logged out: shoppers see a prompt to log in, for example "Login to check if you have NEC to redeem on this order".
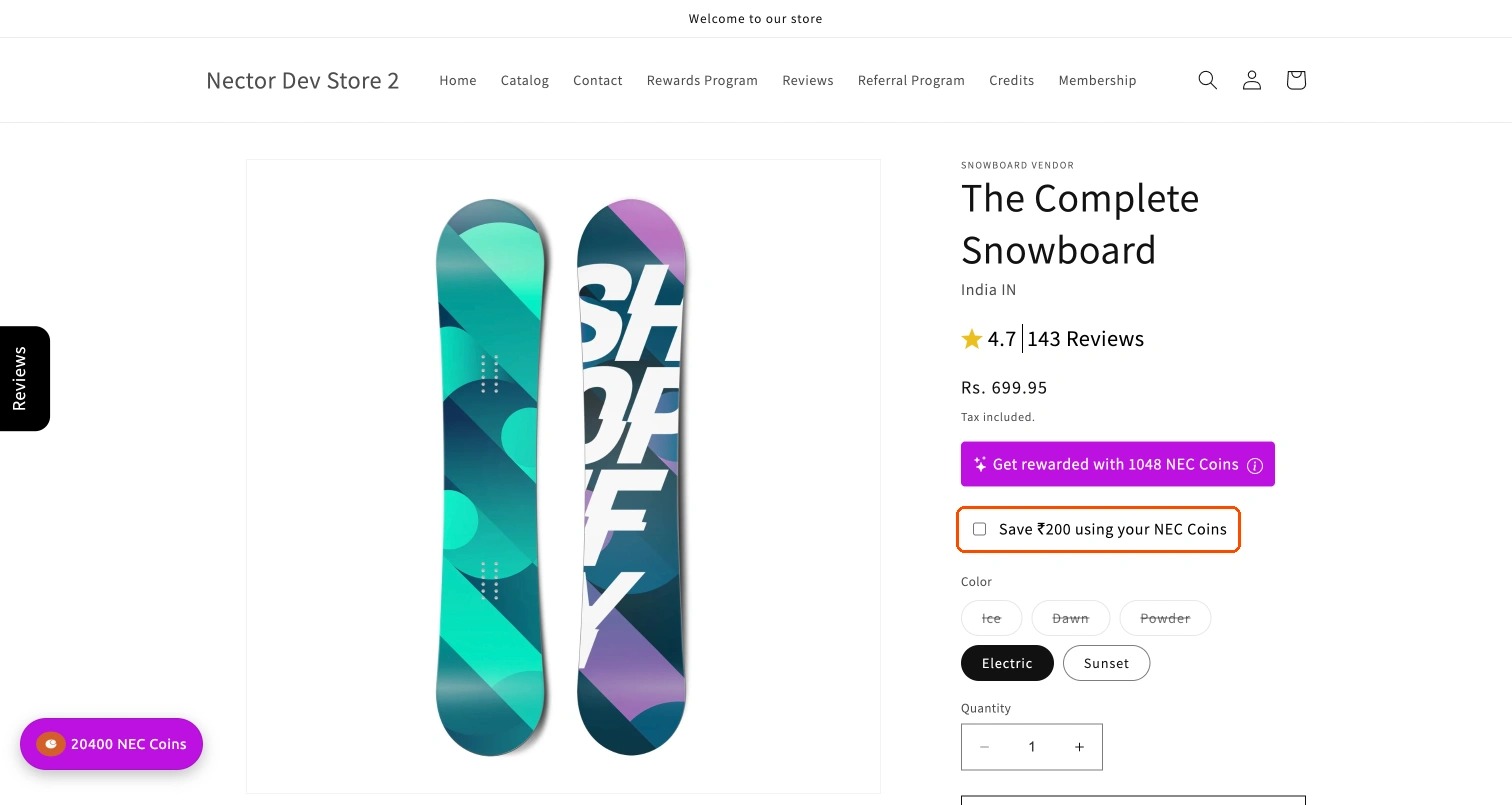
- Logged in: customers with enough points see the discount they can get, as in this example: "Save ₹200 using your NEC Coins". The discount is applied at checkout.
Tip: 💡 Tip: To change the widget later, open the Customise tab on the Points Redeem Widget page in Nector and click Open Shopify theme editor. Then click the Points Redeem Widget block to open its settings. If the widget doesn't appear, check that every step on the Setup tab is done, including the redemption rule, and that you clicked Save in Shopify. Changes can take up to 5 minutes to show on your store.
Updated on: 04/11/2026
Thank you!